
[ad_1]
Campaign for North Africa has probably the most in-depth and sophisticated fight system ever created. Today, we have a look at how gamers kill one another.
Welcome again to this persevering with have a look at The Campaign for North Africa, probably the most difficult battle sport ever made. If you’re not sure what this monstrosity is, I really useful testing the earlier entries:
Today, we have a look at fight. It’s fairly essential to a wargame, so it appears a logical subsequent step. Like most of CNA, the fight system isn’t difficult simply kinda tedious. To quote the rulebook itself:
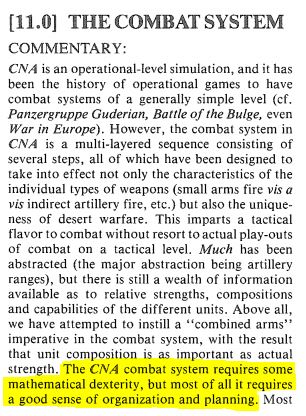
“The CNA combat system requires some mathematical dexterity, but most of all it requires a good sense of organization and planning.”

WARNING
If you’re afraid of tables, flip again now.
Basics of Combat in Campaign For North Africa
To preserve a semblance of realism, Campaign For North Africa makes use of considerably of a “you-go-I-go” fight order sequence. However, there are some variations. The lively participant is named the ‘phasing player.’
Combat happens in spite of everything gamers have moved. The phasing participant will get their full motion, and the non-phasing participant will get motion reactions. The phasing participant should assault all enemy-occupied hexes which have models exerting Zones of Control upon pleasant models.
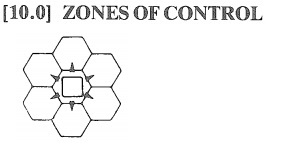
A unit’s Zone of Control (ZOC) is the six hexes surrounding it. Not all models have a ZOC, however most floor fight models do. Things like plane, floor assist models, warships, minefields, and any fight unit with a Cohesion Level of -26 or worse would not have a ZOC. Things like terrain additionally have an effect on a unit’s ZOC.
During motion, the non-phasing participant should inform the phasing participant if a unit may exert a ZOC right into a hex that that phasing participant has moved a unit into or one during which a unit begins its motion. Sort of like calling ‘Check’ in Chess.
3, 2, 1, FIGHT!
First, a broad overview of fight. Then we’ll get into every part in additional element. Combat is damaged down into 4 ‘combat activities’.
- Artillery Barrage
- Retreat Before Assault
- Anti-Armor
- Close Assault
The barrage begins, and every participant secretly determines which of their models will barrage which enemy hexes. Players barrage on the identical time, hex by hex, however casualties usually are not eliminated till in spite of everything barrages are full.
The non-phasing participant might now Retreat Before Assault with any models not pinned in the course of the barrage.
Both gamers then secretly assign models to anti-armor and/or shut assault roles. Any unit with an Anti-Armor score could also be assigned to Anti-Armor. This is completed by dividing the TOE Strength Points between them.
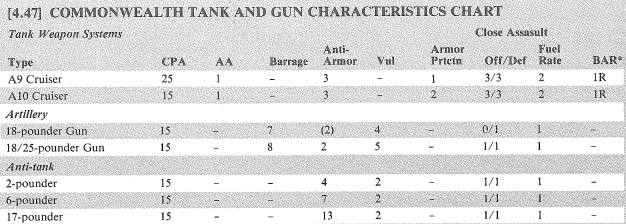
TOE (Table of Organization and Equipment) Strength Points characterize the forces required to combat successfully. It’s an important stat for any unit. It’s kind of like their Hit Points in a variety of methods.
Subscribe to our publication!
Get Tabletop, RPG & Pop Culture information delivered on to your inbox.
TOE Strength Points are principally how many individuals/weapons within the unit, which determines what number of issues they will shoot at. Each unit may have its TOE and weapon system listed on its Unit Characteristics desk. If a unit is under a minimal TOE Strength, it’s thought of a Shell Unit.
Both sides interact in Anti-Armor Fire. All outcomes are taken earlier than transferring into Close Assault.
Barrage

Players assign Barrage Points to every hex they want to barrage.
Each barrage is resolved by rolling two cube and mixing them such that the decrease result’s acknowledged earlier than, the upper (i.e., rolling “2” and “5” would grant “25”). The result’s cross-referenced within the desk above for the variety of Barrage Points spent, the cube outcomes, and the focused unit’s sort.
The unit will both be unaffected, Pinned, or Pinned and lose 1 or 2 TOE Strength Points. Pinned models cannot Retreat Before Assault doesn’t partake in Close Assault.
Retreat Before Assault
Retreat Before Assault is fairly self-explanatory and easy, which is stunning contemplating these are two phrases I might by no means use when describing Campaign for North Africa.
RBA works similar to regular motion does. The non-phasing participant expends CPA and Fuel, with additional prices for Break Off or Retreat to maneuver any models in fight. Units might not RBA from one enemy ZOC into one other.
Anti-Armor
In this part, models with an Anti-Armor score will fireplace upon models with an Armor Protection Rating. Anti-Armor firing is simultaneous for each gamers.
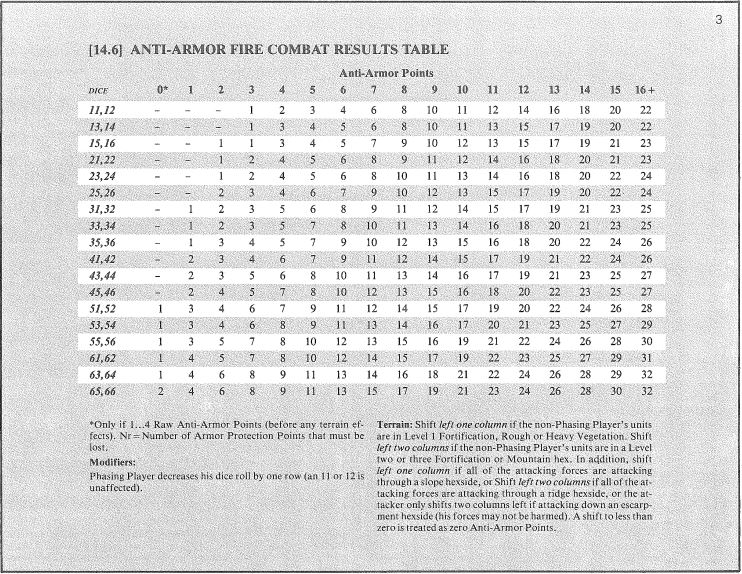
Similar to Barrage, Anti-Armor fireplace is set by rolling two cube for every volley of fireplace on every hex. The firing participant references the above desk to find out the harm handled the Anti-Armor Points spent and the outcomes of the cube roll to find out how a lot harm was dealt.
The defending participant then will get to allocate that harm to models inside that hex, eradicating TOE Points from models with Armor Protection Rating. However, this harm just isn’t dealt till all Anti-Armor assaults have been made.
Close Assault
Unlike the earlier fight phases, Close Assault doesn’t occur concurrently. The phasing participant chooses a hex to assault and fight begins there.
Close Assault works with a differential level system. Both gamers decide the Close Assault Points they’re expending in the direction of the fight. Then the defender subtracts their Points from these of the attacker to find out the differential. Each participant rolls two cube as earlier than and consults the chart under.
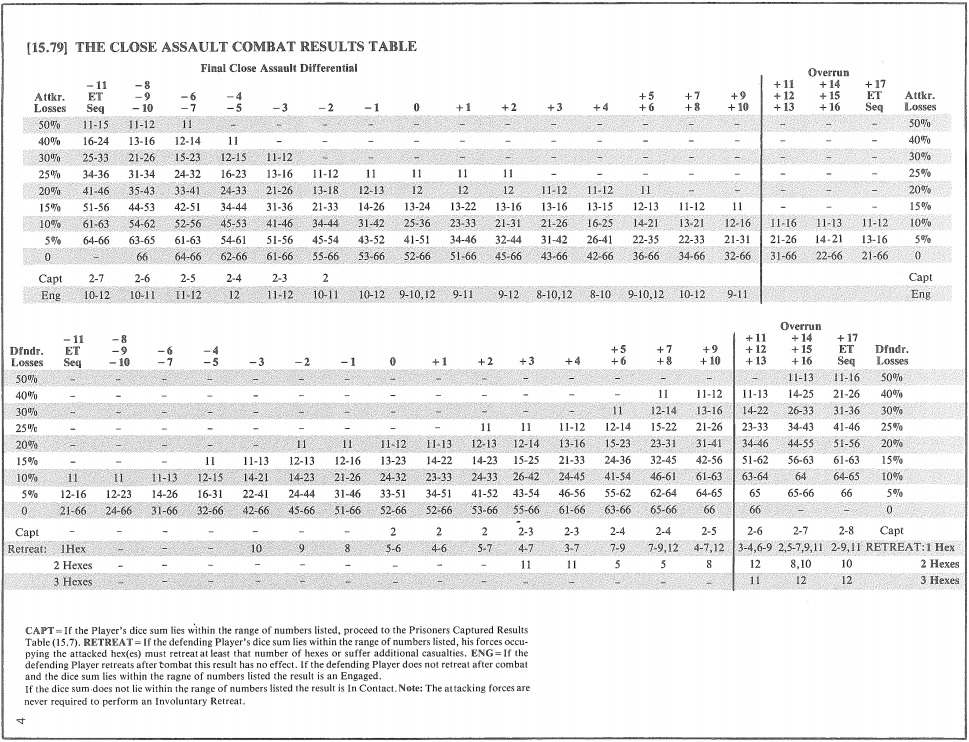
Unlike in different fight phases, casualties are taken instantly earlier than transferring on to the subsequent hex’s Close Assault.
Both gamers then take the sum of that cube roll to find out if the models are engaged, additionally what number of of their losses are attributable to being captured and if their models retreat. The gamers test to see if the sum of their fight roll matches the numbers listed within the CAPT, ENG, and Retreat rows. If the sum does match, some losses are attributable to seize, the models are engaged, and a few models retreat, respectively. The attacking participant won’t ever involuntarily retreat.
If losses are attributable to seize, the participant rolls a die to find out the proportion.

If a unit is engaged, they’re locked in fight. This carries just a few issues with it, largely additional level expenditures if the unit needs to maneuver or depart fight.
Final Thoughts
That’s the gist of how fight works in Campaign for North Africa. As with each side of CNA, there are a great deal of different bits and items I ignored for the sake of the tutorial.
Things like selecting in case your artillery gun-line is Forward or Back and the way that impacts Close Assault, unit stacking (Note: it’s allowed), how terrain and morale have an effect on fight, and performing a Probe assault, simply to call just a few.
This sport is difficult. That’s kinda the entire level of this sequence.
Matt has cherished video games of every kind his complete life: board, video, battle, roleplaying. He’s labored as a author for BoLS since 2017. He’s labored as freelance editor for board sport rulebooks and has designed lots of his personal video games as properly.
[ad_2]