
[ad_1]
Mac OS is an inherently safe and personal working system, however that does not imply there’s nothing you are able to do to make sure that it is as protected and personal as potential. Here’s easy methods to make your Mac personal and safe in a couple of alternative ways.
Lock down administrator accounts
MacOS permits a number of consumer accounts to be arrange on a single Mac. That’s an actual comfort, particularly in the event you share a machine with relations or colleagues.
However, all consumer accounts aren’t the identical, and there is one step you must take to restrict entry to your Mac’s settings: Make certain you solely have one administrator account. Administrator accounts, versus common accounts, can do something on a Mac. They can handle different consumer accounts, together with altering their passwords. They can set up software program and alter all system settings, together with safety and privateness settings.
You solely want one account with that stage of management. In truth, it is not a nasty concept to create a separate account only for administrative functions. That account ought to have some identify aside from “admin” or “administrator” to make it tougher for a hacker to guess the username, too.
Step 1: To change an account’s safety stage, open System preferences > Users and teams.
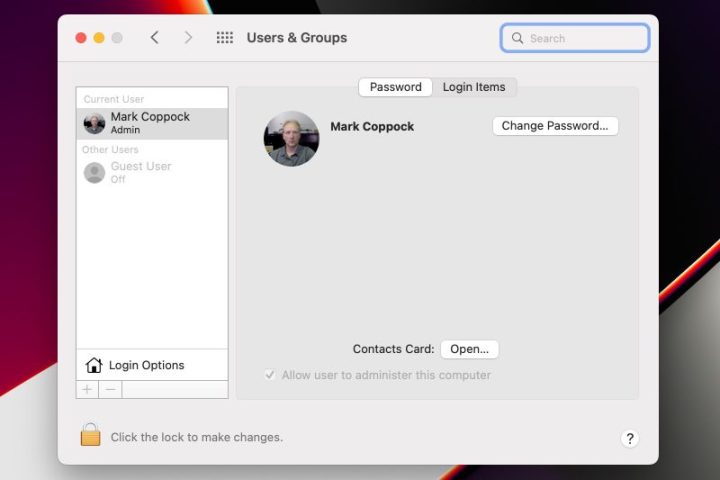
Mark Coppock/Digital Trends
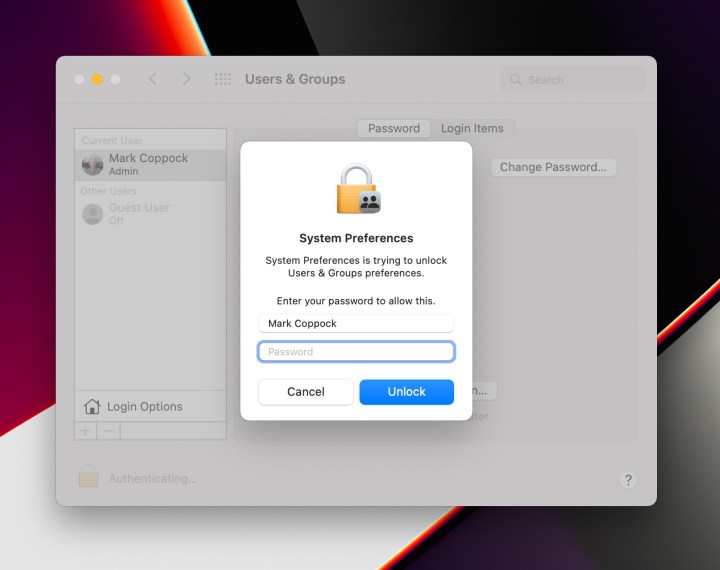
Step 2: To make any modifications to an account, you’ll first have to unlock the account. Select Click the lock to make modifications after which enter the password for the present account. Note that you’re going to have to be utilizing an administrator account to make these modifications.
Mark Coppock/Digital Trends
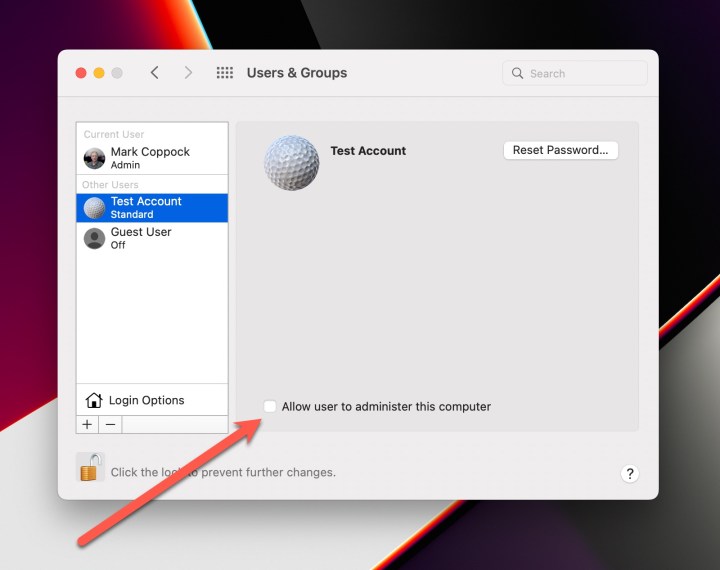
Step 3: Select the account that you simply need to allow or disable administrator privileges for. To allow administrator privileges, choose Allow consumer to manage this laptop. If the account already has administrator privileges and also you need to take away them, then uncheck this setting.
Once you’ve got completed, choose Click the lock to stop additional modifications.
Mark Coppock/Digital Trends
Manage your Mac’s idle time
Leaving your Mac unattended and logged in can current a safety drawback. That’s why it is a good suggestion to make it possible for your Mac locks itself after a time frame and requires logging in from sleep or when the display screen saver is operating.
Note that you should utilize MacOS Hot Corners characteristic to right away lock your Mac. Check out our information on easy methods to use MacOS Hot Corners to be taught extra.
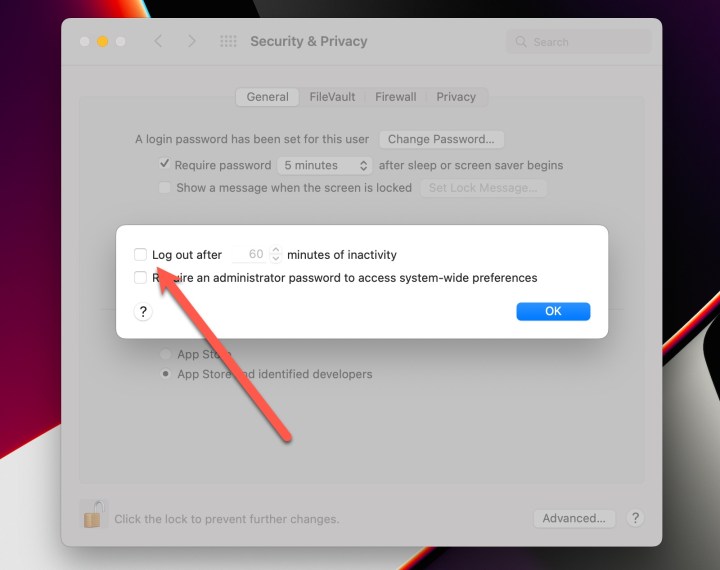
Step 1: To set your Mac to log off after a while, choose System Preferences, Security & Privacy, then the General tab. Unlock the web page utilizing Click the lock to make modifications. Select Advanced… within the decrease proper nook.
On the next display screen, you possibly can choose Log out after and specify what number of minutes of exercise to attend earlier than logging out.
Mark Coppock/Digital Trends
Step 2: Another possibility to extend safety is to require a password after the laptop computer goes to sleep or after the display screen saver runs. You can select a timeframe from instantly as much as eight hours later.
In System Preferences > Security & Privacy > General, you will discover the choice to configure this safety setting. You also can set a lock message from the identical display screen.

Mark Coppock/Digital Trends
Turn on the MacOS firewall
MacOS has a firewall that may be turned on to guard incoming connections. The firewall is turned off by default.
Step 1: To activate the firewall, open System Preferences then Security & Privacy. Select the Firewall tab and unlock the settings. Select Turn on Firewall.
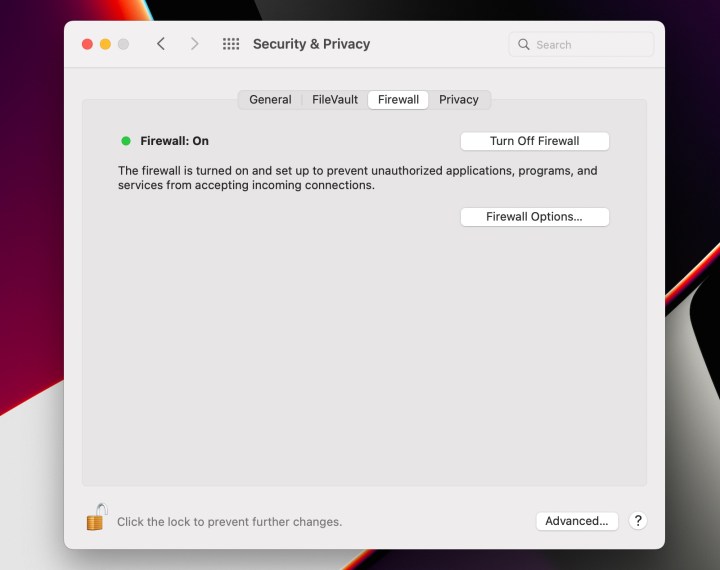
Mark Coppock/Digital Trends
Step 2: Select Firewall Options… to configure the firewall. You can disable all incoming connections apart from fundamental web companies, mechanically permit the built-in software program to obtain connections, mechanically permit downloaded signed software program to obtain connections, and allow stealth mode to cover the Mac from take a look at functions.
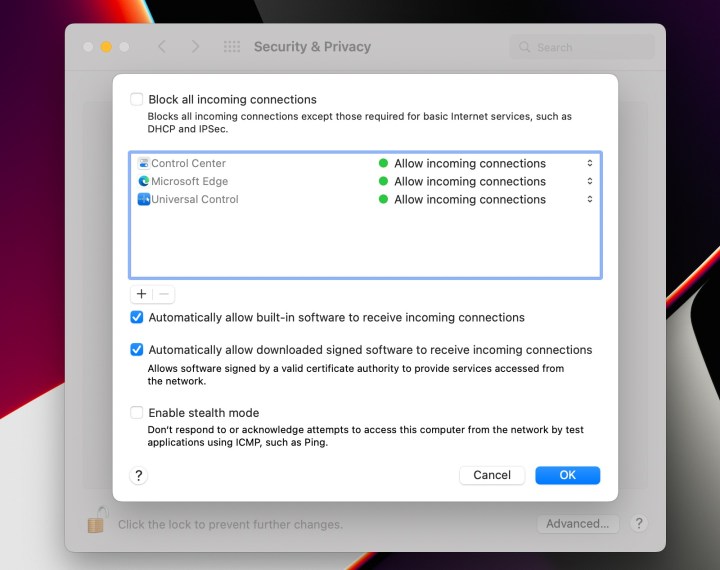
Mark Coppock/Digital Trends
Turn on the FileVault
MacOS has built-in disk encryption, referred to as FileVault, that makes it almost inconceivable for somebody to entry your information with out logging in to your Mac. If it is not enabled by default, you must flip FileVault on as one among your first duties when organising your Mac.
Step 1: To flip FileVault on, open System Preferences after which Security & Privacy and choose the FileVault tab. Select Turn on FileVault…
You might be offered with the choice to both use your iCloud account to unlock your disk or create a restoration key. Using your iCloud account is extra handy and helps keep away from the opportunity of shedding your restoration key.
Once you’ve got set your choices, choose Continue.
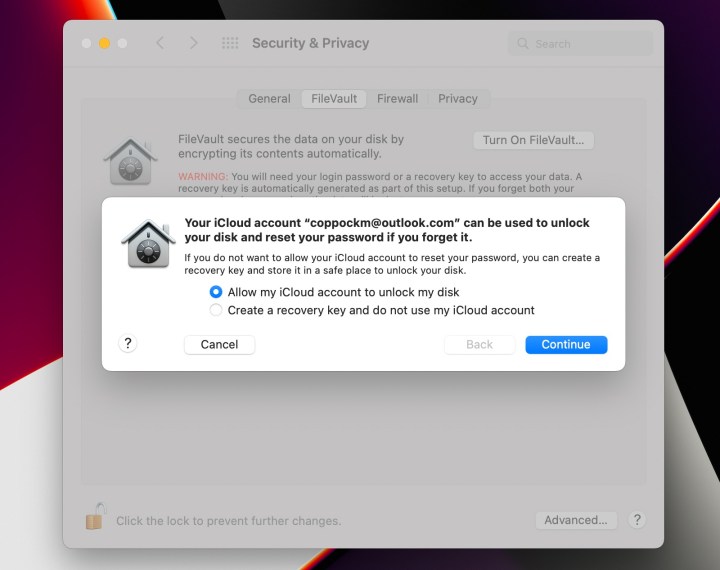
Mark Coppock/Digital Trends
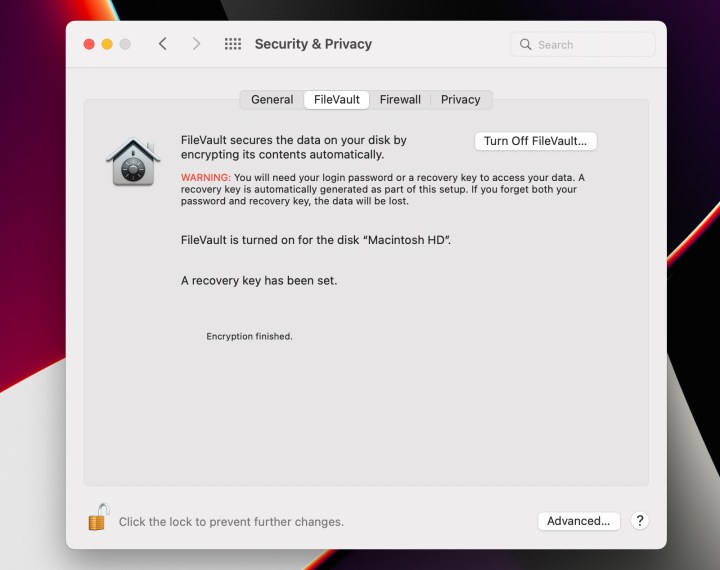
Step 2: The disk might be encrypted and the progress reported within the window. Once it is accomplished, you will obtain a notification {that a} restoration key has been set and that encryption has completed.
Mark Coppock/Digital Trends
Configure entry to built-in companies
You can permit varied functions and companies to entry the built-in options and companies in MacOS or disallow them for added privateness.
To configure your privateness settings, open System Preferences and Security and Privacy. Select the Privacy tab. Unlock the settings to make modifications.
You’ll see a listing of companies on the left, after which a listing of functions and companies that may entry each on the fitting. You can permit or disallow entry to every service as required.
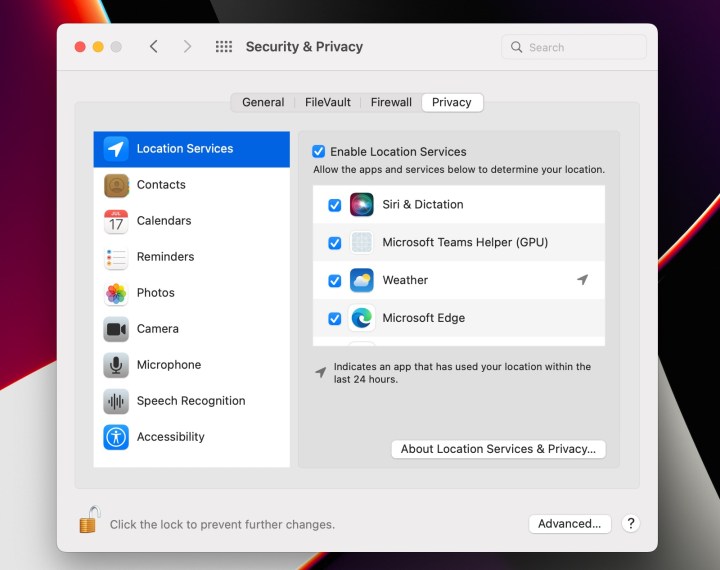
Mark Coppock/Digital Trends
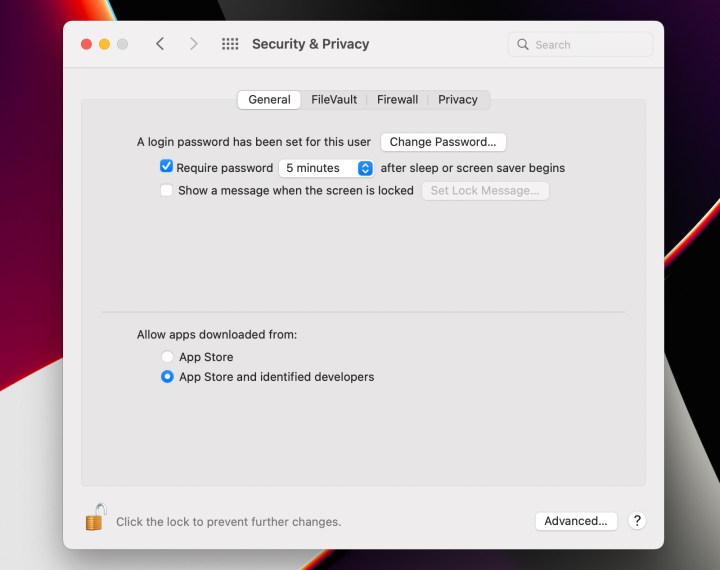
Control which apps might be put in
You can set up apps in your Mac from each the App Store and from third-party builders. MacOS permits you to management whether or not third-party apps might be put in.
To permit or disallow third-party apps, open System Preferences and Security and Privacy. Unlock the settings to permit modifications.
Under Allow apps downloaded from:, choose both simply the App Store or each the App Store and recognized builders.
Mark Coppock/Digital Trends
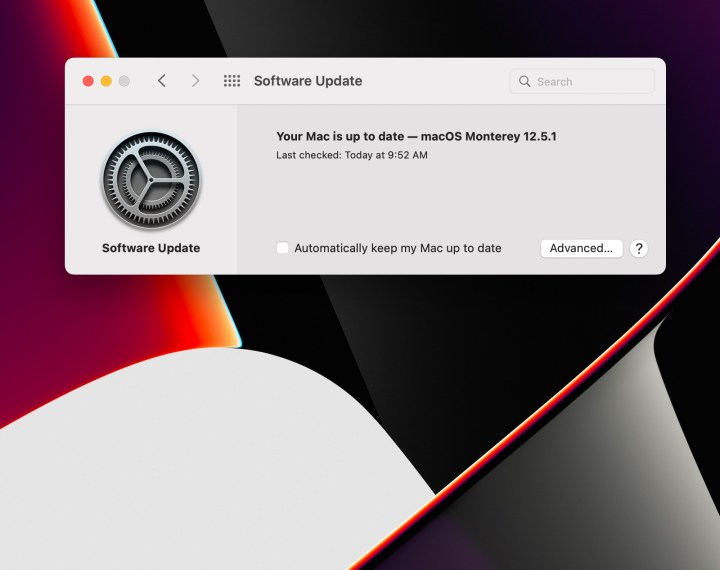
Automatically replace your Mac
MacOS can mechanically set up varied software and system updates, however that is not enabled by default. Turning on automated updates, significantly for safety updates, helps maintain your Mac protected against malicious actors.
Step 1: To activate automated updates, open System Preferences, then Software Update. Check Automatically maintain my Mac updated to activate automated updates. You might want to authenticate to make the change.
Mark Coppock/Digital Trends
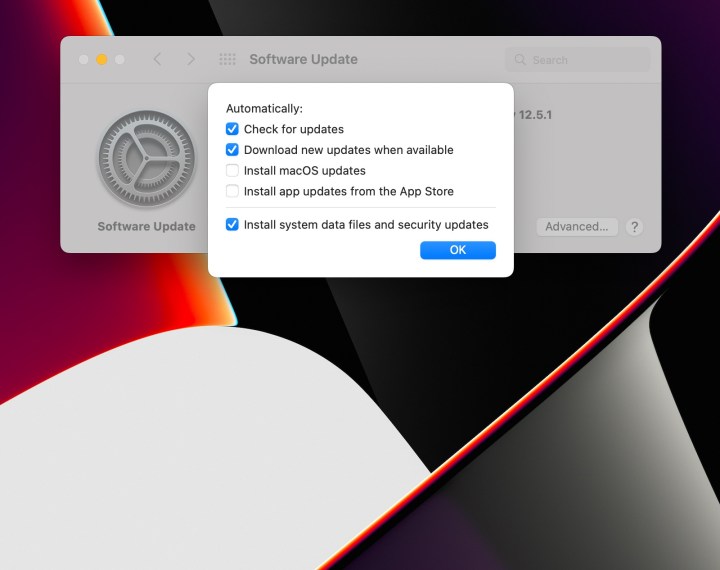
Step 2: You can specify which updates to mechanically set up by choosing Advanced…. You can configure MacOS to mechanically test for updates, obtain new updates when accessible so that they are prepared to put in, mechanically set up MacOS updates, mechanically replace apps put in from the App Store, and mechanically set up system information information and safety updates.
At the very least, you must activate automated updates of system information information and safety updates. These can arrive at any time and have to be put in as rapidly as potential. Letting MacOS set up them mechanically implies that they’re going to be put in as quickly as Apple makes them accessible.
Mark Coppock/Digital Trends
Editors’ Recommendations
[ad_2]