
[ad_1]
Ubuntu is without doubt one of the hottest Linux distributions on the earth and has been for a decade. It is simple to make use of and pleasing to have a look at, with an easy person interface and a streamlined set up. The Ubuntu Software Store makes Linux repositories straightforward to make use of, like downloading apps from the Google Play Store or Apple App Store. It’s additionally fully free to make use of, like most Linux distros, and studying tips on how to set up Ubuntu on a Windows laptop does not take lengthy.
There are three set up sorts to select from, so it is advisable know the way you wish to use Ubuntu. For instance, you should use it inside a Windows digital machine, or you should use Bash options straight from Windows. But these are for very particular use instances. For our functions, we’ll assume you wish to obtain a contemporary copy of Ubuntu straight onto your laptop for on a regular basis use. Here’s how you are able to do that.

Canonical/Dell
Meet Ubuntu
The world’s hottest Linux distro is created by Canonical, a South Africa-based firm. While Ubuntu is free to put in and use for people, organizations will pay for help and for a number of different Ubuntu-based merchandise, similar to server software program.
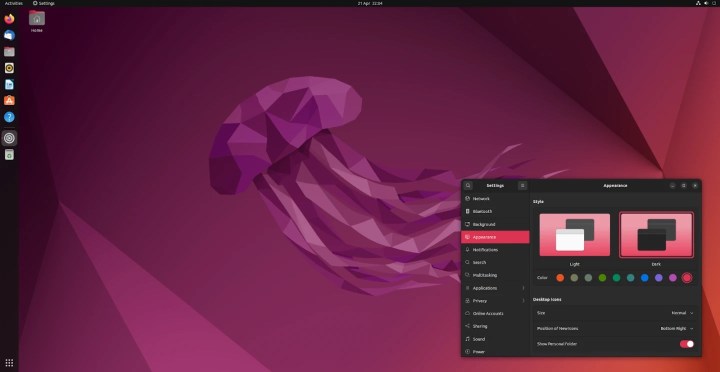
Ubuntu will get common updates each six months and main overhauls each two years. These overhauls, known as LTS (for long-term help), introduce new Ubuntu variations and often a foolish animal title. For instance, the most recent LTS is Ubuntu 22.04 “Jammy Jellyfish.” It was launched in spring 2022, and Canonical will help it for 2 years.
Ubuntu makes use of the GNOME desktop surroundings, which is the underlying person interface you see once you use Ubuntu. GNOME retains the desktop clear and uncluttered and means that you can launch purposes just by clicking on an icon relatively than inputting code into the terminal. GNOME offers you a Mac-like taskbar alongside the highest of your display screen the place you’ll be able to see the date and time, entry app-specific recordsdata and choices, and use different helpful options.
However, if you wish to get extra nerdy, you’ll be able to. After all, Ubuntu is a Linux distro, which implies the terminal is rarely too far-off. This can even can help you tweak settings and opens up the total energy of Linux. For occasion, you should use the terminal to transform a bunch of photographs into PDFs directly, or you’ll be able to create nested file directories deep within the system.
Canonical
Download Ubuntu
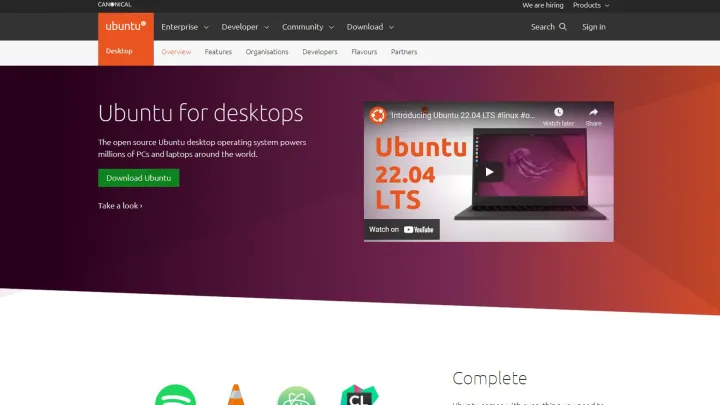
The first step to putting in Ubuntu is to obtain Ubuntu. It comes as a single ISO picture and is 2GB in measurement.
Step 1: Head to the Ubuntu desktop website on your favourite browser.
picture: Nathan Drescher
Step 2: Select Download.

picture: Nathan Drescher
Step 3: You will discover the downloaded ISO in your downloads folder.
Format your USB stick
Once you have downloaded Ubuntu to your laptop, you may have to create a reside USB stick. This is what your laptop will use to put in and run Ubuntu the primary time round.
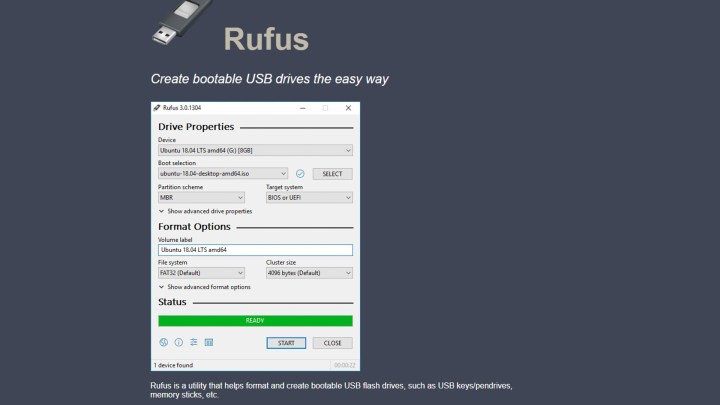
You’ll want to put in a free third-party USB formatting program to do that, however don’t fret, these are small purposes they usually’re extraordinarily straightforward to make use of. You can delete it afterward when you do not wish to hold it.
We suggest utilizing Rufus for Windows. Here’s how.
Step 1: Download and set up Rufus.
picture: Nathan Drescher
Step 2: Launch Rufus as soon as it’s put in.
Step 3: Choose your USB drive from the Device menu if it hasn’t auto-populated.

Nathan Drescher
Step 4: Choose Select, to the precise of the Boot Selection menu

Nathan Drescher
Step 5: Select the Ubuntu ISO file you downloaded.

Nathan Drescher
Step 6: The Volume Label menu will replace to indicate your model of Ubuntu. Leave the opposite settings as is.
Step 7: Select Start.
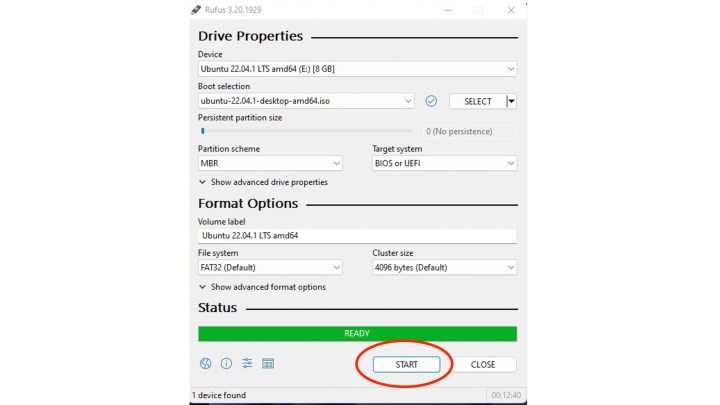
Step 8: Wait whereas Rufus writes the Ubuntu ISO to your USB. You can see the progress within the standing bar on the backside. It ought to take 10 minutes or much less.
Step 9: Your USB is prepared when the Status bar is inexperienced and shows “Ready.”
Replace your OS with Ubuntu
Next, you are going to set up Ubuntu on the pc or laptop computer of your alternative. You can select to partition your arduous drive and dual-boot Ubuntu or to fully overwrite your present working system and use solely Ubuntu.
Step 1: Insert the USB thumb drive together with your reside Ubuntu ISO into the pc.
Step 2: Restart the system.
The laptop ought to acknowledge the USB thumb drive and boot from it instantly. However, if this does not occur, you will have besides your laptop.
With the thumb drive inserted, restart your laptop. Then maintain down F12 in the course of the startup and choose your USB system from the Device menu.
Step 3: Choose Install Ubuntu.
You can test-drive Ubuntu direct from the USB. However, it is a restricted model of Ubuntu and won’t save something.

Nathan Drescher
Step 4: Choose your language, and choose Continue.
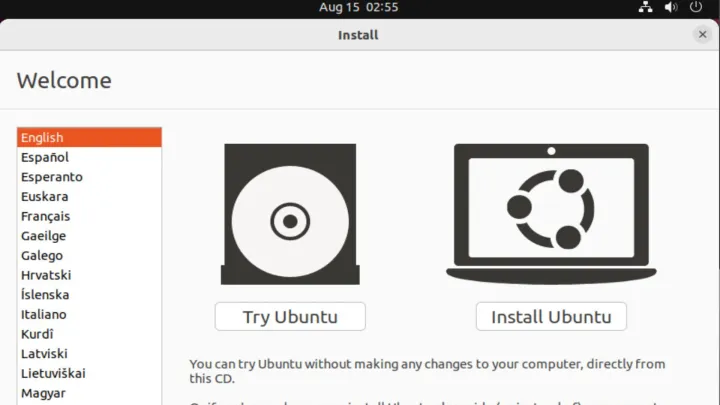
Nathan Drescher
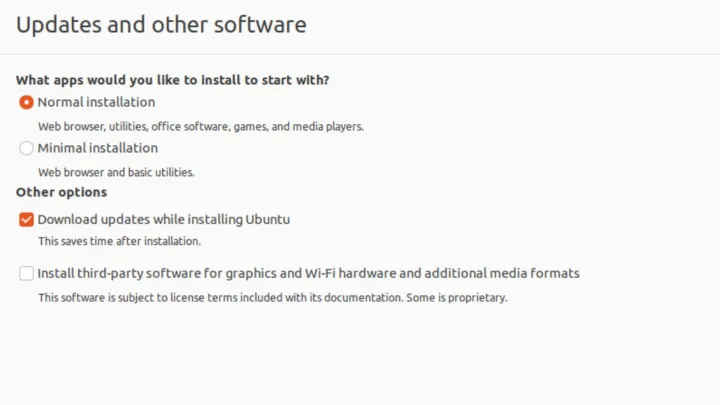
Step 5: Select your most popular set up setup.
We suggest selecting Normal set up except you’re utilizing an especially restricted laptop.
Select Download updates whereas putting in Ubuntu and Install third-party software program for graphics and Wi-Fi {hardware} and extra media codecs.
Select Continue.
Nathan Drescher
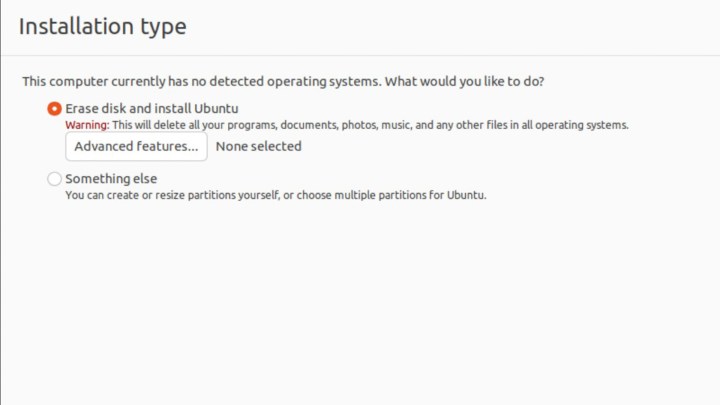
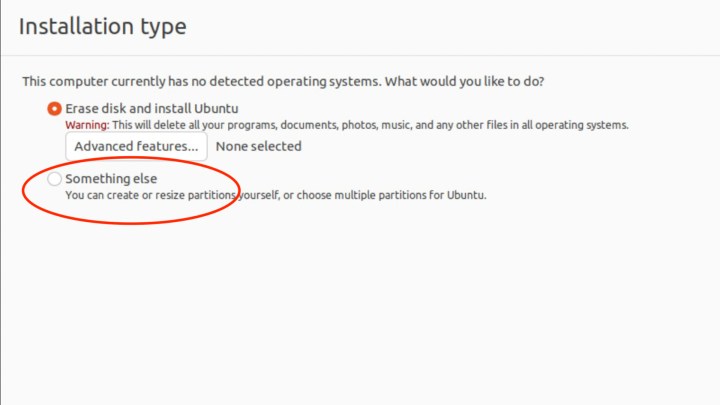
Step 6: The Installation Type menu means that you can select between overwriting your present system with Ubuntu and dual-booting Ubuntu from a partitioned drive.
Select Erase disk and set up Ubuntu, adopted by Install Now.
Nathan Drescher
Step 7: Choose your location.
Press Continue.

Nathan Drescher
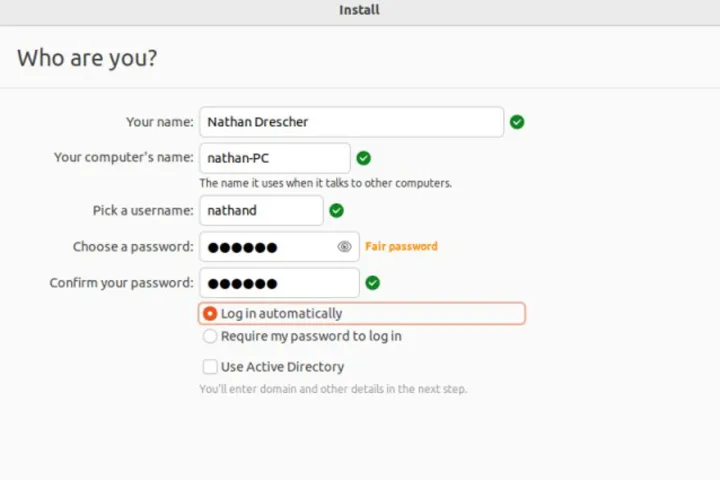
Step 8: Input your particulars. Add your title, your laptop title (make this up), and choose a username. You’ll additionally have to create a password for logging into Ubuntu and a few Ubuntu companies. Keep it safe however straightforward to recollect.
You can then choose to log in to your laptop robotically or require a password every time you utilize it. Ignore the Use Active Directory possibility for now.
Select Continue.
Nathan Drescher
Step 9: Ubuntu will now full the set up.

Nathan Drescher
Step 10: Select Restart now when the set up is completed.

Nathan Drescher
Step 11: Congratulation! You simply put in Ubuntu!
Install Ubuntu alongside your working system
If you do not wish to fully erase your present OS, be it Windows, Mac OS, or one other Linux distro, you may want to put in Ubuntu on a partitioned drive. Thankfully, the Ubuntu installer makes it straightforward to do that.
For starters, you may have to undergo steps one to 6 within the “Replace your OS with Ubuntu” part above. However, once you get to the Installation Type menu, you’ll be able to soar all the way down to right here and we’ll stroll you thru the remaining.
Step 1: From the Installation sort menu, choose Something else and click on Install now.
Nathan Drescher
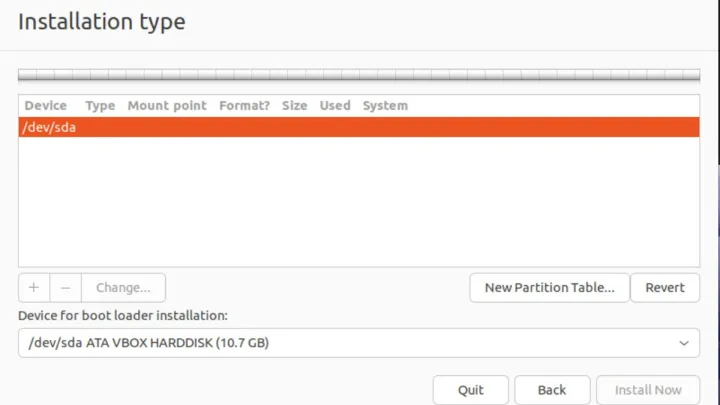
Step 2: Select New partition desk on the subsequent display screen.
Nathan Drescher
Step 3: Select Continue on the pop-up.

Nathan Drescher
Step 4: Double-click on Free area to create a brand new partition.
A brand new partition window pop-up will seem.
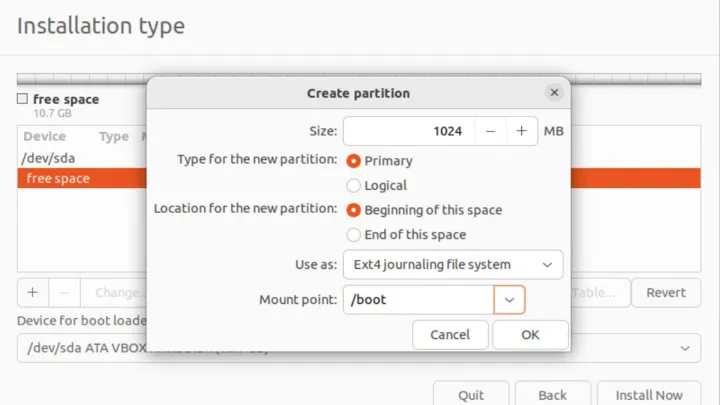
Step 5: In the Create partition menu, set the scale to 1024MB.
Set the kind for brand spanking new partitions to Primary.
Set the situation for the brand new partitions to Beginning of this area.
In the Use as menu, choose Ext4 Journaling file system.
In the Mount level menu, choose /boot.
Select OK.
Nathan Drescher
Step 6: Double-click on Free area to create a house partition.
Leave the free area as is.
Set the kind for brand spanking new partitions to Primary.
Set the situation for the brand new partitions to Beginning of this area.
In the Use as menu, choose XFS journaling file system.
In the Mount level menu, choose /residence.
Select OK.

Nathan Drescher
Step 7: Double-click on Free area to create a root file system.
Set the kind for brand spanking new partitions to Primary.
Set the situation for the brand new partitions to Beginning of this area.
In the Use as menu, choose XFS journaling file system.
In the Mount level menu, choose /.
Select OK.

Nathan Drescher
Step 8: Double-click on Free area to create a swap partition to assist when RAM fills up.
Set measurement to 4096.
Set the kind for brand spanking new partitions to Primary.
Set the situation for the brand new partitions to Beginning of this area.
In the Use as menu, choose Swap space.
Select OK.

Nathan Drescher
Step 9: Now that you have a partition scheme arrange, you’ll be able to full your Ubuntu set up.

Nathan Drescher
Step 10: Choose your location.
Press Continue.
Nathan Drescher
Step 11: Input your particulars.
Add your title, your laptop title (make this up), and choose a person title.
You’ll additionally have to create a password for logging into Ubuntu and a few Ubuntu companies. Keep it safe however straightforward to recollect.
You can then choose to log in to your laptop robotically or require a password every time you utilize it.
Ignore the Use Active Directory possibility for now.
Select Continue.
Nathan Drescher
Step 12: Ubuntu will now full the set up. Hit Restart now when the set up is full.
Nathan Drescher
Congratulations! You have efficiently put in Ubuntu and might now dive right into a clean and quick OS with the flexibility to deal with nearly something you throw at it. Interested in making an attempt different distros? Here’s an inventory of our favourite Linux distros.
Editors’ Recommendations
[ad_2]