
[ad_1]
The submit shouldn’t be about idea artwork, which is probably going what involves thoughts when character design is talked about. I’ve determined to adapt the ideas to my objectives whereas I implement the unique ideas, to have an incremental growth course of. Instead, I wrote quite a bit about 3D character modelling and animation.
Some context: the earlier detailed scene is a 2D vector animation in Synfig, and I’m at present turning it into a real 3D animation in Blender.
Translating 2D to 3D made me affirm that I ought to hold designing the 2D World in 2D software program; 3D is extra complicated not solely in form, however in colours, you’ve extra vertices to work with, and you can be compelled to take care of issues you do not have to handle with 2D for those who do not want them, like normals or cameras. Therefore, 3D design shouldn’t be solely extra complicated, but additionally has further steps, and the technicalities of the transition from 2D to 3D may simply fill a submit. The upside: as soon as the whole lot is setup animations shall be simpler, since you do not have to deal with shading instantly or create new shapes whenever you change angles.
At this level , there’s nonetheless an opportunity of going again to 2D animations, however I really feel I want a bit extra expertise with each 2D and 3D earlier than making a remaining selection.
I’ll now describe the elements that had been fascinating, and the way I handled them.
Anatomical baseline
To get a baseline 3D mannequin I made a decision to attempt MakeHuman Community, which creates a 3D humanoid mesh in keeping with enter variables. The give attention to realism overcomplicates it, resulting from issues like enter variables being unitless statistical averages as a substitute of generally used SI models or giving the selection to maneuver the eyesocket vertical measurement on the interior, center and outer portion, whereas the eyeball has an unbiased measurement worth, however being a volunteer undertaking aiming at a troublesome process means it additionally falls wanting being sensible in some ways. I’ve handled detailed anatomy earlier than, so I saved utilizing the software program as a substitute of in search of options.

Default MakeHuman output in Blender
What I did is conserving observe of any values that I’d need to change for all fashions, and worth modifications of particular fashions. This felt overkill whereas I did it, however afterwards I’m glad I did; I needed to alter and remake the mannequin a number of instances as a result of I discovered I wished to alter a pair issues that affected how the opposite values are interpreted. Of course, I additionally saved the file with the mannequin’s modifications, however having a separate ordered report of 30 and one thing modifications as a substitute of checking lots of of values to see in the event that they had been totally different within the save file saved time.
I seen that many values, whereas statistically common, the place under no circumstances prefer it’s depicted within the media, and even how I image our bodies in my head; for these I modified the values to much less sensible aesthetically-pleasing values. I’m making a recreation not a real-life medical sim.
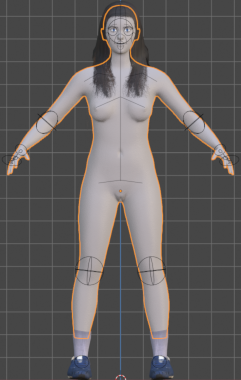
Final MakeHuman output with Rig helper
There’s different software program for this
- MB-Lab is extra superior however with extra restrictive licensing (so it was discarded)
- VRoid Studio with Japanese anime characters
- Metahuman creator for sensible characters which might be freely used with the Unreal Engine (and subsequently discarded)
- …and possibly extra I do not learn about

I may even have tweaked a pre-made free or paid mannequin, and even simply make a brand new mannequin, however this must be executed by somebody with a stronger basis on designing characters.
Hair modeling
I’m not aiming at sensible hair, so I modified the form and colours. Multiple studying sources say that it is onerous to be environment friendly at creating toon hair as a result of the strategies to simply make the required 3D shapes fail when outlines, cel-shading or non-realistic texturing are utilized, as supplies do not look as supposed and UV coords are onerous to visualise. This leads artists to complete by shaping one huge mesh with a a lot of small incremental tweaks vertex by vertex, then unwrapping UVs face by face. Because I do not hate myself, I compromised with versatile workflow with a restricted quantity of steps, and minimal tweaking on the finish. It’s not streamlined, however not too complicated both.
The first huge takeaway got here from real-life cosmetology: cut up hair by areas. Cosmetologists sometimes cut up hair in 7 sections, however they need to seize hair with their arms, and I need to construct a 3D mesh. Most sources cut up hair in entrance, sides and again, which is sufficient generally, however since I’m prototyping I simply did back and front, with the edges ensuing from merging these areas.
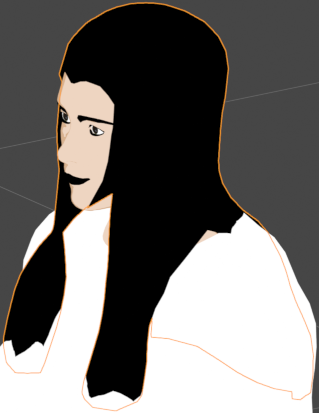
Current hair. Shirt is absolutely black so overlaps are invisible
Wearables modeling
My first try at clothes was utilizing Blender’s Cloth Modifier. Even if it isn’t an animation, this technique requires to simulate physics for a number of seconds, then cease and hold the deformations. Turns out that mathematical fabric simulation has many shortcomings resulting from being an approximation of one thing that requires precision, subsequently it is reserved for enhancing wrinkles. Even although I managed to keep away from jitter after dozens of tries, I noped the hell away from that timesink that I do not actually need.
Unstable fabric simulation
Stable fabric sim after tweaks and hacks
Second attempt was modifying MakeHuman’s belongings, nonetheless I did not spend time on it since I wasn’t assured they might animate nicely. I now assume that in case you have premade belongings meant to your base mesh, tweaking them is the perfect method to including garments. You’ll need to do much more tweaking of vertices and weight paint with no matter you create anyway.
Regardless, I ended duplicating a part of the physique mesh and enhancing it to be able to know precisely how the garments work. The footwear had been the one half I felt I’d get a great outcome from premade belongings.
Wearables!
Graphical type
It appears bizarre to work on ‘type’ after shaping the meshes, however some points confirmed solely as a consequence of the shapes.
The black colour for the whole lot however pores and skin, irises and genitals was chosen to be cover errors on the primary mannequin. Choosing forgiving parameters for the preliminary phases was an amazing thought. Most tweaks had been resulting from mesh overlaps, and this prevented having to tweak much more for now.
Next, since I’m going for a toon type, contemplating a top level view appears pure. I attempted a number of strategies.
First attempt that appeared to work was the ‘inverted hull’ technique. It works with a barely larger mesh duplicate with the define colour, however solely displaying what’s not going through the digicam. Most of the half to be drawn is roofed by the unique, leaving a protruding edge. Main draw back is there are extra vertices and supplies to course of, and may have tweaking for skin-tight clothes. Inverted hull outlines can protrude by garments when seen at some angles, even when the garments have their very own define. Usually a vertex group of the coated physique is made made and hidden, however this does not work for the translucent wearables I’m utilizing. You can as a substitute be very actual with the dimensions of the outlines and the space of the fabric from the physique fabric distance from the physique (which might be set by physics calculations), but it surely will get sophisticated quick. A giant benefit of outlines by inverted hulls is that it may be applied in a recreation engine with out shaders, however I’m not rendering 3D in-game so it is irrelevant.
Too small so that you can see, too huge for gamers to disregard
I additionally tried producing 3D mesh strains utilizing edge-detection when seen by the digicam (Blender’s model is known as Line Art). It permits you to customise the strains greater than an inverted hull, however seems to be bizarre whereas modelling and might construct strains in locations you do not need extra usually than an inverted hull. In normal, dynamically producing a top level view has fewer downsides than an inverted hull.
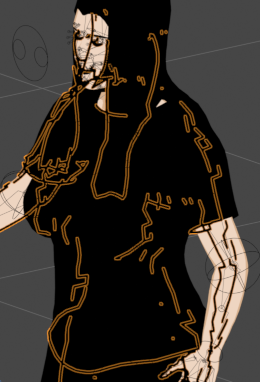
Better cover the messy strains if not enhancing them
Another possibility are rasterizing outlines as 2D post-processing (Freestyle in Blender). It’s visually much like constructing strains, however they aren’t proven whereas modelling, reverse to the above, some individuals do not like them due to that. Also, edge-detection after 3D rendering is the quickest technique. This video compares render instances, displaying it’s ~5 instances quicker than producing 3D meshes for strains. However, in keeping with Blender’s documentation a limitation is reminiscence utilization.
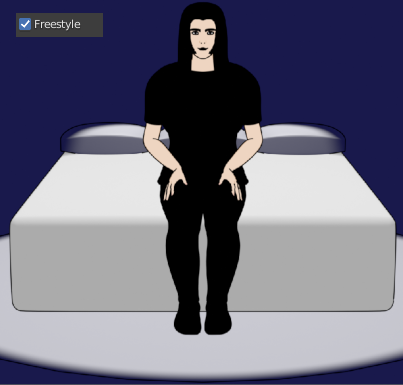
Check a field and the whole lot will get a top level view
After all this, I attempted merely utilizing a fabric as a top level view. I left it for final resulting from incorrectly assuming it might result in the uncanny valley. With 2D artwork, it is simpler to attract strains than to shade however shading finest demonstrates depth, even when used as a pretend define. To get an outline-like materials use fresnel equations. For visible artists, a ‘fresnel impact’ simply means gentle you see mirrored modifications relying in your viewing angle, so colours are totally different relying on curvature. This invitations the uncanny valley in static photographs, however material-based outlines are lovely when animated. The huge draw back is giving up management. You can change the general thickness, however the relative thickness of every half is given by the faces’ angle and the define is at all times drawn on the mesh.
Curve-following outlines with supplies
You may create a texture and paint the outlines. The draw back is that the outlines are usually not truly 3D, so whenever you rotate the mesh they may rotate with it. I did not spend time on it.
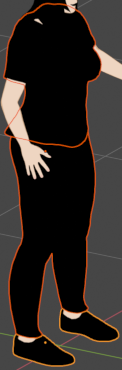
In observe, individuals usually mix these strategies, usually inverted hull + cel-shading + textures with totally different tones. I’m going for a easy aesthetic, so I’m simply going to make use of fresnel cel-shading for now. I discovered it extra pleasing than the opposite strategies as it’s the one which finest reveals the form of the mesh, and it matches the type of the world, the place drawables haven’t got outlines both (the primary character does have a top level view, however I’m planning to alter it for consistency), and as a bonus it is one of many much less complicated strategies to arrange. In the long run I could add an inverted hull with the identical colour because the shading simply to provide the define a minimal thickness.
Rigging and skinning
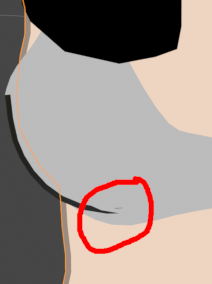
I went by fairly a little bit of effort to get roughly correct automagic rigging and weight portray on the physique. Some protrusions stay when bending and handbook weight paint retouching is required. Retouching will typically mess up different actions, and this normally means there are not any edges within the mesh geometry which can be perpendicular sufficient within the bending zone, so retopo is so as. The third possibility is utilizing management bones to cut back the affect of bones which can be inflicting an excessive amount of bending, however I did not have a necessity for that. This (5 minute!) video for an older model of Blender is the perfect useful resource I obtained on weight portray. Either approach, you must at all times count on the necessity of some handbook retouching to weight paint.
Another possibility is transferring weights from the physique, however that may even require retouching and outcomes could also be much like automated weight portray. However, even when it didn’t want retouching, you do not need garments to deform like pores and skin. For instance, take a look at your bare shoulder, and carry your arm excessive; you do not need that crease even with skin-tight clothes.
Yet one other technique is to repeat vertex transforms from shut vertices of one other mesh (Blender does it with the Surface Deform Modifier). I experimented with two subdivided planes, seen it may be finicky (normals typically flip and later transformations typically have an effect on earlier transformations), so I went again to weight portray.
Weight portray works nicely sufficient, but it surely’s a separate talent to be learnt, as a result of it is extra like sculpting (ZBrush type) than portray. Also, it’s essential be taught to configure the software so it behaves predictably, for instance, as a substitute of changing the weights, take into account including or substracting paint in small quantities. Enable auto-normalize by default, be taught what which means, however remember that in case you have a single bone influencing a vertex the load shall be caught at 1.
Finally, weight portray requires high quality management. Check your complete vary of movement of every joint from a number of angles, specifically the acute ones that solely allow you to see the bending space whereas the remainder of the mesh is roofed by no matter you’ve within the scene.
Ugly protrusions throughout animations are so well-known that I do not really feel imagery is required.
Animation
Whew! I’m virtually executed!
There’s additionally lots of software program for animating:
- Animaze permits realtime facial features movement monitoring and mapping to a 3D mannequin
- Live2D Cubism has pseudo-3D animations from a 2D character picture, once more with face monitoring
- Cascadeur is a 3D character animator with a free tier
- Daz 3D is a 3D character animator that is straightforward to make use of with pre-made fashions on the market
- Poser is a straightforward to make use of 3D character animator however you purchase this system and should purchase pre-made mannequin units
- Adobe Fuse CC is a discountinued 3D character animator
- Mixamo is a web-based animating service with many predefined animations
- …and possibly many extra

Overwhelmed with the choices, I made a decision to stay to Blender for now. I really feel animation is essentially the most technical, repetitive and time-consuming a part of the workflow, if solely as a result of you must take care of the errors from earlier phases too. So save time, and like the whole lot in 3D, reuse and mirror alongside the X-axis when there’s symmetry.
Everything on this submit above this line is licensed to the general public beneath the CC-BY-SA 4.0 License.

[ad_2]